Last Updated on October 13, 2024 by Admin
Website migration is a technical process that can cause a lot of problems for your website if it is not done properly. Whether you are migrating between different domains, redesigning your site, or migrating from one content management system to another, the risks are high.
The BrightEdge case study also reveals how some companies see their organic search traffic literally dips to almost zero for several weeks due to migration mishaps. To avoid such misfortunes and ensure that your site retains all the SEO value that it has achieved, it is imperative to follow the entire list of SEO guidelines while migrating.

This blog covers 16 essential SEO steps to ensure a smooth website migration, helping you minimize traffic loss and maintain rankings throughout the process.
16 Crucial SEO Steps When Migrating Your Website
Website migration is not simply changing your domain or redesigning your pages; it is a vital procedure that affects your SEO. If not well handled, one is likely to lose important rankings, traffic, and visibility, which are crucial in Website marketing. This is why following these 16 crucial SEO steps when migrating your website will help maintain your search engine performance while enhancing the usability of the new site.
1. Backup Your Website
Before starting any migration process, the first step should be to take a full website backup. This backup will be helpful in case something goes wrong during the transition and the new system needs to be introduced. Ensure all the necessary parts, such as databases, images, content files, and system settings, are fully backed up. This backup will be useful if the migration process goes wrong since it means you can always go back to the previous design.

- Copy all files on the website, such as pictures, papers, and databases.
- Make a replica of the current structure of your website.
- If your work is with people, save and store it in a secure cloud storage system or an external drive.
- Ensure your development and SEO teams know where the backup is located.
- CMS settings should be backed up.
- The backup should also cover all the plugins, themes & other custom codes used on the site.
2. Set Up a Staging Website

A staging site is an intermediate location where the new site can be tried out and brought to life without affecting the normal operations of the site. Another advantage of the staging site is that you can detect problems that may occur to the real users before they happen. Here, too, apply end-user or other related tests to determine bugs, broken links, or any SEO issues before going live. You will use a lot of effort and time fixing bugs that could have been detected earlier during testing here.
3. Plan Your Migration Timeline
A good time plan is a crucial factor when it comes to migration. Design a plan with a definite timeline for testing, creating backups, migration, and post-migration checks. It is also important that the migration process be done during off-peak hours to avoid causing inconvenience. Synchronize how quickly your team is available to respond to quick fixes. Emphasis on planning reduces hasty decisions, reduces time wastage, and is useful when responding to post-migration problems.
4. Protect the New Domain
When changing to a new domain, be sure the new domain is secured before launching. Password protects it, does not make it a public folder, and prevents search engines from crawling it. This step is important so that the new domain is not accidentally indexed by Search Engine or used by the user. The htaccess and htpassword should be employed to lock the site until all updates are done.
| Task | Description |
|---|---|
| Password Protect | Use htaccess or htpassword to prevent the new domain from being accessed by anyone in public. |
| Add “noindex” | Robots.txt should contain the noindex meta tag to avoid search engines indexing the unfinished site. |
| Monitor staging | Staging is a good place for your new domain until you are ready to go live and all the tests have been conducted. |
| Disable redirects | Make sure that no links are pointing to the new domain before the launch. |
| Test regularly | Always look for any accessibility to the new domain that is not wanted. |
5. Block Crawlers and Indexing
To ensure that search engines do not index your new, still-under-construction site before you complete the migration process, disallow bots. This helps you minimize issues of duplicate content and the half-baked site being indexed in search engines. In the robots.txt file, use noindex, nofollow, and disallow to prevent search engines from indexing the site before it is ready.
Here’s how to do it:
- Include no index tags in the robots.txt file.
- Use nofollow tags to avoid the loss of link juice at the wrong time.
- You should use the disallow directive to prevent particular folders from being indexed.
- Make sure that the robots.txt file does not disallow any important areas.
- Do not forget to exclude noindex and nofollow tags once the site is ready for launch.
6. Compare Your Current Position in SEO
An essential step before starting the migration is benchmarking the current SEO performance. Gather statistics for organic traffic, page ranking, backlinks, and bounce rates. This will enable you to benchmark your post-migration SEO outcome and see areas that require more enhancement. With such data, you are in a position to notice any adverse effects the migration may have on your SEO and immediately counteract them.
7. Create a 301 Redirect Map
A 301 redirect map to help users and search engines move from the old URLs to the new ones to retain your SEO position. Without these redirects, one might end up with broken pages, and a search engine might not find where to send traffic, leading to a big SEO hit. Make sure that every old URL is linked to a new URL for search engine value transfer.
8. Internal Link Audit and Optimization

Internal links can also be easily damaged during migration, which can negatively impact your website’s architecture and usability. When redesigning a website, make sure all internal links point to the new URLs before the site goes online. Misplaced links can sabotage SEO since they lead to orphaned web pages or provide the system with wrong information.
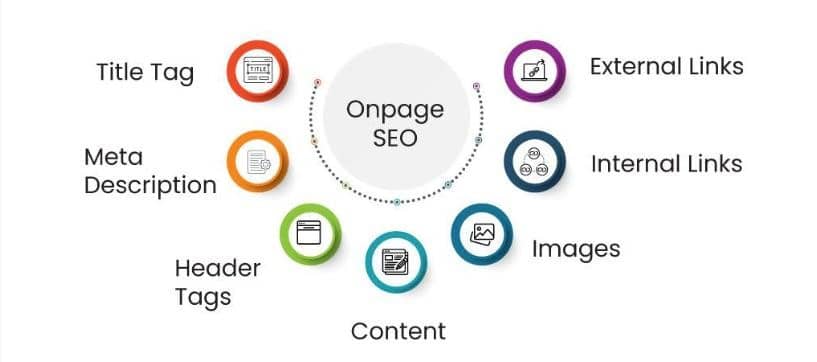
9. Optimize On-Page SEO Elements
Due to migration, it is a good time to review and improve your site’s on-page SEO factors. This involves changing meta titles and descriptions, header titles, and image alt attributes to reflect the content you are serving your client and include keywords. Optimizing these elements helps the search engine better understand your content and potentially enables you to rank higher.

Key on-page elements to optimize:
- Meta titles
- Meta descriptions
- Header tags (H1, H2, etc.)
- Image alt text
- URL structure
- Content quality and relevance
10. Preserve and Update Canonicalization
Implementing proper canonical tags on your new site is crucial for avoiding duplicate content issues. This step involves ensuring that canonical tags point to the correct, preferred versions of your pages, especially if you’re consolidating content or changing URL structures. Proper canonicalization helps search engines understand which version of a page should be indexed and ranked, preserving your SEO value.
Canonicalization best practices:
- Use self-referencing canonical tags on unique pages.
- Point canonical tags to the preferred version for similar or duplicate content.
- Update canonical tags for pages that are being consolidated.
- Ensure canonical tags are consistent across different page versions (e.g., mobile and desktop).
- Check for and resolve any conflicting canonicalization signals.
11. Create and Submit Updated XML Sitemaps
Creating new XML sitemaps for your migrated site is necessary because it will help search engines find and index newly created sites easily. These sitemaps should contain all relevant Website pages along with their new URLs. These sitemaps should be submitted to Google Search Console and, where possible, Bing Webmaster Tools to improve the speed of crawling of the new structure. Check the indexation status frequently to be sure that search engines have started crawling and indexing your new pages.
12. Create a Custom 404 Page
In actual migration, broken links can occur, even though they may be avoided by closely following planning. A custom 404 page directs users back to the main content rather than having them stuck at a ‘404 dead-end’. A good 404 page enhances usability by giving the user easy options to return to the other parts of the site without leaving it.
13. Resubmit Your Site to the Google Search Console and Bing Webmaster Tools
That is why it is crucial to change the site information in Google Search Console and Bing Webmaster Tools after the migration. All these changes can be easily made using the “Change of Address” feature in Google Search Console when you want to inform Google about your new domain. In like manner, it is important to update your site information on Bing Webmaster Tools. These steps assist the search engines in recognizing your old and new domains, hence assisting the search engines in re-indexing them faster.
14. Update External Backlinks
Contacting the owners of other significant websites that have placed links to your previous domain is very helpful in maintaining and earning backlinks. For this kind of outreach, only target the high-authority sites and your most important backlinks.
Just give them the new correct URLs and let them know about the migration. Whereas 301 redirects will pass on link juice, it is best to get direct links pointing to your new pages for the best SEO and the users in the long term.
15. Implement Schema Markup

If you have not done so on your previous site, creating and using the appropriate schema markup on your new site is high time. The fact is this structured data assists search engines in understanding your content and can cause the so-called ‘rich snippets’ on the pages of search results that have a positive impact on click-through rates. Select proper types for the delivered contents and use the JSON-LD format to implement them for enhanced working.
16. Supervise the Post Migration Performance
Therefore, it is advisable to monitor the network incessantly after migration. You should track organic traffic, keyword rank, and bounce rates enough to troubleshoot any problems that come up. Instant access to information enables you to identify and fix all potential post-migration issues, including 404 errors, lost traffic, or ranking drops. Regularly analyze your website using tools such as Google Analytics and Google Search Console.
Performance monitoring aspects:
- Check the key indicators against the benchmarks you had before migration.
- Monitor the number of organic visits to the key web pages.
- Check the position of keywords for the selected terms.
- Bounce rate, time spent on a site, and number of pages viewed per session are the parameters that should be evaluated.
- Look for any sudden dips in conversion rates or overall sales.
- Google Analytics and Search Console can be used to recognize possible problems.
- If you find that there are large declines in performance, be ready to make changes rapidly.
Conclusion
Website migration is a very technical process that, if done wrong, may damage SEO. If you follow the above-discussed essential SEO factors when transferring your website, you can safeguard your rankings, traffic, and customers.
Utilizing SEO services from AlgoSaga will help you migrate smoothly and avoid expensive SEO blunders. Having done this before, AlgoSaga guarantees a seamless website migration, which will have little or no effect on your website’s performance. Contact them today to speak about how to protect your SEO through migration.
